Enrolling kids in summer music programs can have a multitude of benefits that extend far beyond just learning to play an instrument. At Freeway Music, these programs offer a unique opportunity for children to explore their creativity, develop discipline, and enhance their cognitive abilities. Here are some key reasons why summer music programs are important for kids:
- Creativity and self-expression: Music is a powerful form of self-expression, allowing children to convey emotions, thoughts, and feelings in a creative way. By enrolling in a music program, kids can tap into their creative potential and explore different genres and styles of music.
- Cognitive development: Learning music has been shown to have a positive impact on cognitive development. It can improve memory, enhance mathematical skills, and increase spatial-temporal skills. Music also helps children develop critical thinking and problem-solving abilities.
- Discipline and perseverance: Mastering a musical instrument requires dedication, practice, and perseverance. By enrolling in a summer music program, kids learn the value of hard work, discipline, and patience. These qualities can transfer to other areas of their lives, helping them excel academically and professionally.
- Social skills and teamwork: Many summer music programs involve group activities, such as playing in a band or orchestra. These experiences teach children valuable social skills, such as collaboration, communication, and teamwork. Kids learn to listen to each other, compromise, and work together towards a common goal.
- Confidence and self-esteem: As children develop their musical skills and see their progress over the course of a music program, their confidence and self-esteem grow. Performing in front of an audience, whether it’s a small group of parents or a larger concert hall, can help kids overcome stage fright and build confidence in themselves.
- Cultural appreciation: Music is a universal language that transcends cultural boundaries. By enrolling in a music program, kids have the opportunity to explore music from different cultures and time periods. This can broaden their perspectives, foster appreciation for diversity, and spark a lifelong love of music.
Overall, enrolling kids in music programs, especially starting in the summer, when they have less on their plate, can have a lasting impact on their personal, social, and academic development. Whether they continue to pursue music as a career or simply enjoy it as a hobby, the benefits of music education are undeniable. If you have the chance to enroll your child in a summer music program, seize the opportunity to help them unlock their full potential and foster a lifelong passion for music.
Music education has long been touted as a valuable tool for children’s cognitive, social, and emotional development. But just how impactful is it? In this article, we’ll explore the numerous benefits of music education for children, backed by credible studies and research.
Cognitive Benefits:
* Improved memory and spatial-temporal skills (Rauscher et al., 1998)
* Enhanced language development and literacy skills (Forgeard et al., 2008)
* Better math and reading skills (Hetland & Winner, 2001)
Social-Emotional Benefits:
* Improved social skills and teamwork (Hallam, 2010)
* Reduced stress and anxiety (Kruger & Schechter, 2017)
* Enhanced creativity and self-expression (Boden & Mayer, 2009)
Brain Development:
* Increased grey matter volume in auditory and motor areas (Schlaug et al., 2005)
* Stronger neural connections and plasticity (Kraus & Chandrasekaran, 2010)
Conclusion:
The evidence is clear: music education gives children a significant jumpstart in life. By introducing music education early on, parents and educators can help shape young minds, foster creativity, and set the stage for future success. At times, when you’re in the moment- it may feel as though progress is slower than you would expect, but it’s important to remember, music education like anything else, takes time to understand, master and produce results. If we allow ourselves opportunity to enjoy the process, the results will surprise you in such an amazing way.
Sources:
Boden, M. A., & Mayer, R. E. (2009). Music and the Mind. Scientific American, 300(6), 72-77.
Forgeard, M., Winner, E., & Schlaug, G. (2008). From singing to speaking: Facilitating recovery from non-fluent aphasia using melodic intonation therapy. Annals of the New York Academy of Sciences, 1145, 243-254.
Hallam, S. (2010). The impact of music education on cognitive development in children. Journal of Research in Music Education, 58(3), 270-282.
Hetland, L., & Winner, E. (2001). The arts and academic achievement: What the research shows. Arts Education Policy Review, 102(5), 3-6.
Kraus, N., & Chandrasekaran, B. (2010). Music training for the development of auditory skills. Nature Reviews Neuroscience, 11(8), 623-630.
Kruger, J., & Schechter, J. (2017). The impact of music education on stress and anxiety in children. Journal of Music Therapy, 54(2), 147-162.
Rauscher, F. H., Shaw, G. L., & Ky, K. N. (1998). Music, cognition, and emotion: A review of the research. Psychology of Music, 26(1), 73-92.
Schlaug, G., Marchina, S., & Norton, A. (2005). From singing to speaking: Facilitating recovery from non-fluent aphasia using melodic intonation therapy. Annals of the New York Academy of Sciences, 1060, 243-254.
Learning to play a musical instrument is a journey filled with excitement, challenges, and, most importantly, patience. For children embarking on this adventure, the concept of patience might seem elusive amidst their eagerness to master the instrument quickly. However, understanding the importance of patience in this process is essential for both parents and educators alike.
Patience serves as the cornerstone of a child’s musical development, fostering a positive and enriching learning experience. Rather than focusing solely on achieving immediate results, cultivating patience allows children to embrace the journey of learning an instrument, nurturing their creativity, and building a lifelong passion for music.
One of the key aspects of fostering patience in children learning a new instrument is encouraging them to “play” rather than “practice.” This subtle shift in language can have a profound impact on a child’s perception of the learning process. By framing their musical exploration as play, children are invited to approach the instrument with curiosity, imagination, and a sense of freedom. This mindset shift empowers children to explore the instrument at their own pace, experiment with different sounds, and express themselves creatively without the pressure of perfection.
Here are some practical tips for suggesting children to “play” rather than “practice” when learning a new instrument:
- Create a Playful Environment: Set the stage for musical exploration by creating a playful and supportive environment. Encourage children to view their instrument as a tool for creative expression rather than a daunting challenge.
- Embrace Mistakes as Learning Opportunities: Help children understand that making mistakes is an integral part of the learning process. Encourage them to embrace their mistakes, learn from them, and use them as opportunities for growth and improvement.
- Encourage Creativity: Foster a spirit of creativity by encouraging children to experiment with the sounds and techniques of their instrument. Provide them with opportunities to improvise, compose their own melodies, and explore different genres of music.
- Celebrate Progress, Not Perfection: Shift the focus from achieving perfection to celebrating progress. Recognize and celebrate each small milestone along the way, whether it’s mastering a new chord, playing a simple melody, or improvising a short tune.
- Be Patient and Supportive: Above all, be patient and supportive throughout the learning process. Encourage children to enjoy the journey of learning an instrument and reassure them that progress takes time.
By encouraging children to “play” rather than “practice,” we empower them to take ownership of their musical journey, make it their own, and develop a lifelong love for music. Through patience, encouragement, and a playful approach, we can nurture the next generation of musicians and inspire them to unlock their full potential.
Introduction:
In the symphony of a child’s development, music education plays a pivotal role, harmonizing cognitive, emotional, and social growth. As we delve into the orchestration of academic studies, it becomes evident that the influence of music on young minds goes far beyond the notes on a page. Let’s explore the symphonic journey of why music education is not merely a supplemental class but an essential element in the composition of a child’s holistic learning experience.
The Cognitive Crescendo:
Research from renowned institutions such as Harvard and Johns Hopkins has been tuning into the cognitive benefits of music education for years. The brain, akin to a musical instrument, undergoes a transformative tune-up when exposed to the intricacies of music. Studies suggest that children engaged in music education demonstrate enhanced cognitive skills, including improved memory, attention span, and problem-solving abilities.
One notable study, conducted at the University of California, found that children involved in music education showed accelerated development in the areas of language processing and mathematical reasoning. The rhythm and patterns inherent in music seem to create a neural symphony, fine-tuning the brain for more efficient cognitive processing.
The Emotional Overture:
Beyond the realms of academia, music education orchestrates a powerful emotional overture in the lives of children. It serves as a melodic refuge, providing an outlet for self-expression and emotional regulation. Music becomes the soundtrack to a child’s emotional journey, helping them navigate the complex tapestry of feelings.
A study published in the Journal of Research in Music Education discovered that children engaged in music education exhibited higher levels of empathy and emotional intelligence. The collaborative nature of playing in an ensemble cultivates a sense of camaraderie, teaching children the art of listening and responding to the emotions conveyed through music.
The Social Symphony:
In the grand performance of life, the ability to collaborate and communicate is key. Music education, with its emphasis on ensemble playing and group dynamics, becomes the rehearsal ground for these essential social skills. You will find resonance in the transformative power of music education to tip the scales in favor of positive social development.
Research from the National Association for Music Education highlights the social benefits of music education, noting that children engaged in musical activities develop a strong sense of teamwork, discipline, and leadership. The shared pursuit of musical excellence cultivates a sense of belonging, transforming classrooms into harmonious communities.
Conclusion:
In the symphony of a child’s education, music is not merely an optional chord but a fundamental note that resonates across the cognitive, emotional, and social dimensions. Let us acknowledge that the true crescendo of a child’s potential is orchestrated by the transformative power of music education. It’s not just about creating musicians; it is about sculpting minds that resonate with the harmonies of lifelong learning and emotional intelligence. The importance of music education, when understood in this comprehensive light, becomes a powerful testament to the enduring melody that shapes the future of our young minds.
As the holiday season approaches, finding the perfect gift for your young guitar player can be challenging. To help you out, we’ve compiled a list of the top 5 holiday gifts based on consumer and expert reviews.
1. Music lessons:
Music lessons provide a unique and lasting experience that fosters creativity, skill-building, and personal growth. Lessons can ignite, or re-ignite passion and help beginners start their creative musical journey. Additionally, music lessons offer a chance to connect to a mentor and join a community, making a thoughtful and engaging gift!
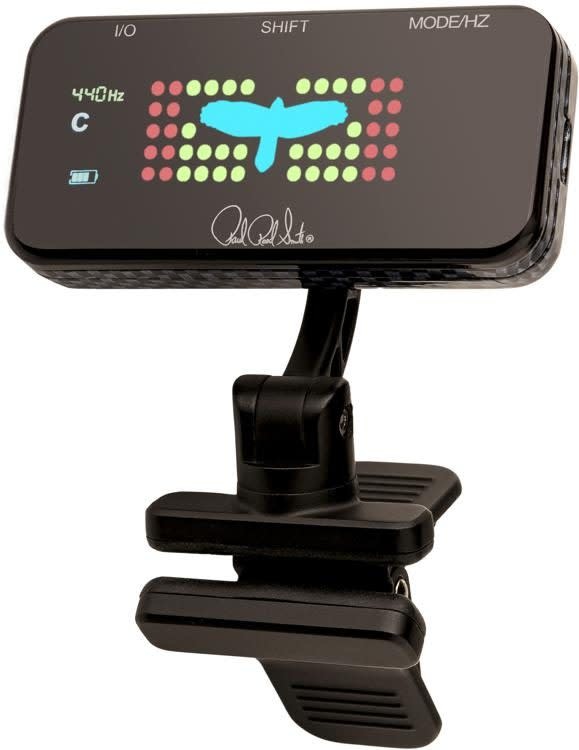
2. PRS Headstock Tuner:
Stay in tune easily and in style with the PRS Clip-On Tuner.
https://www.simsmusic.com/prs-headstock-tuner.html
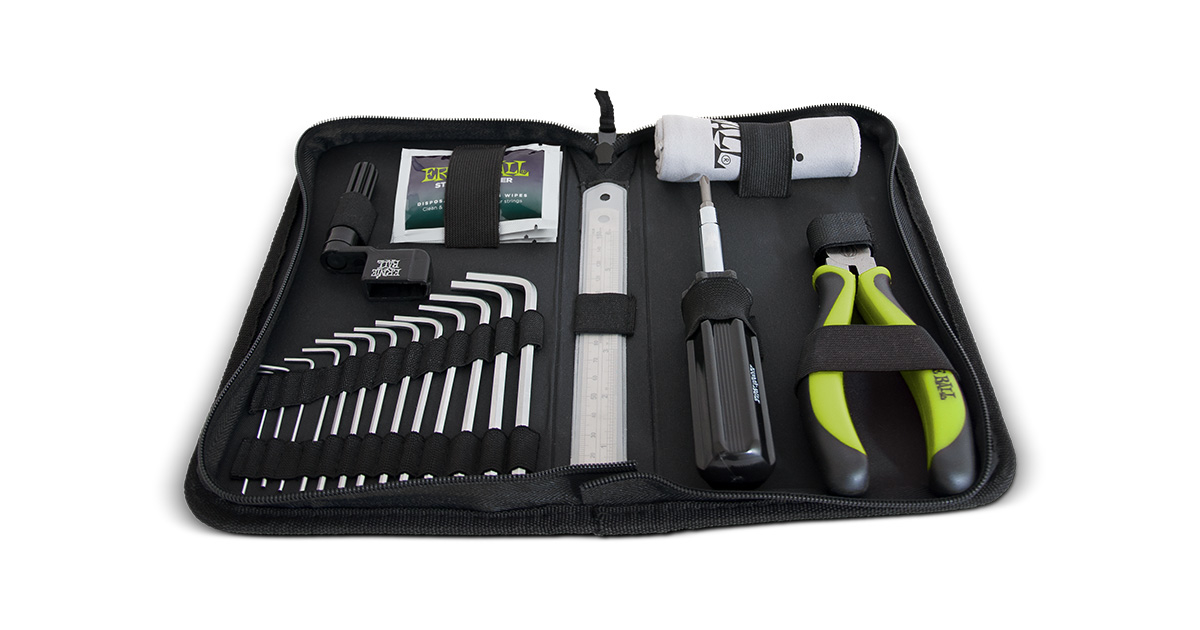
3. Ernie Ball Musician’s Tool Kit – Best Tool Kit:
Ernie Ball’s all in one tool kit is perfect for cleaning, maintaining and keeping your instrument in perfect playing condition. Change strings, set intonation, adjust the action, check string height and more. Tool kit includes Microfiber Polish Cloth, Wonder Wipes, Heavy Duty String Cutter, Peg Winder, 6-in-1 Screwdriver, Ruler, and durable Hex Wrench Set.
https://www.ernieball.com/guitar-accessories/guitar-instrument-care/tools
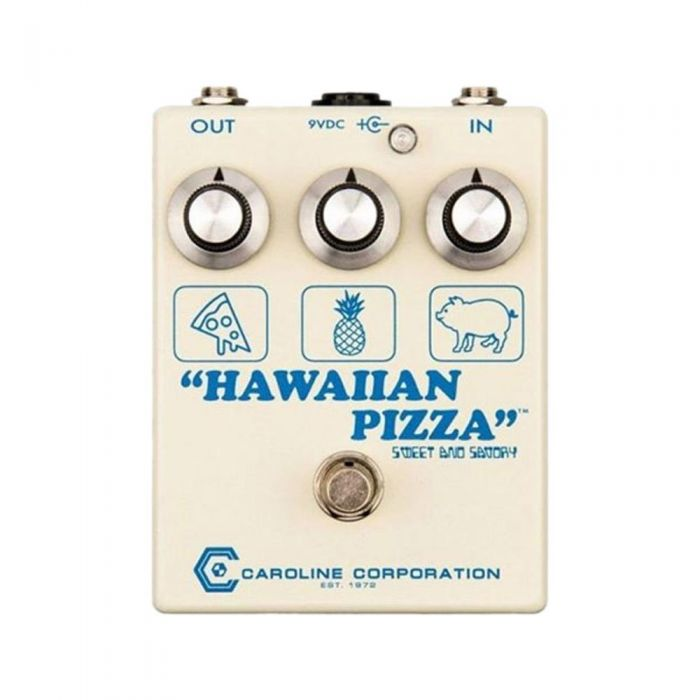
4. Caroline Guitar Co. Hawaiian Pizza pedal:
A bespoke artisanal blockchain of handcrafted tone, the sonic equivalent of a forbidden delicacy, all from just three knobs and the truth.
https://carolineguitar.com/product/hawaiian-pizza/
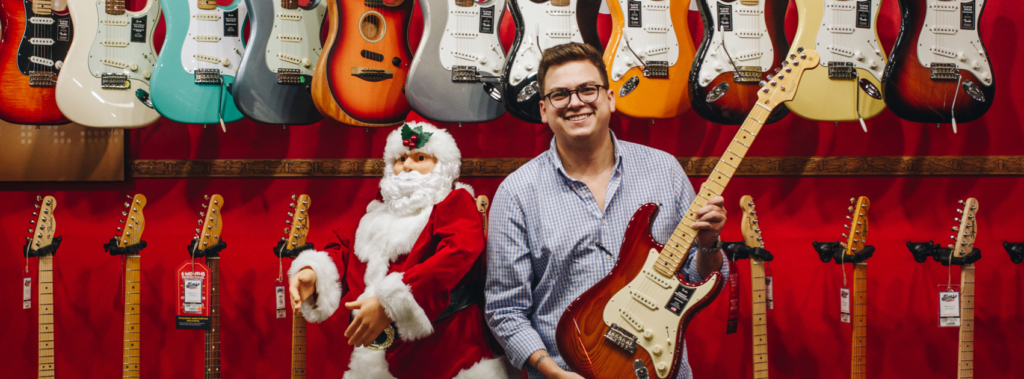
5. A new guitar from Sims Music
What young guitarist wouldn’t love a new guitar? Our partners at Sims Music have an incredible selection for every style and budget with an extremely friendly and knowledgable staff, there to help you make the best decision that will absolutely put a smile on your young guitar player’s face!
https://www.simsmusic.com/products/guitars/electric/
These gifts cater to different needs and skill levels, offering a well-rounded approach to learning and enjoying guitar playing. Whether it’s lessons, accessories, or a new guitar, your young guitarist is sure to be delighted with any of these thoughtful gifts.
Electric Guitar
There are many brands you can start off with for electric guitars, and they are all similar in quality at the entry-level; however, three brands have stood the test of time, and you can’t really go wrong with any of these three brands: Fender, Gibson, and Ibanez. Like anything, you will have a good, better, and best option. For electrics, it comes down to where the instrument was made, hands-on craftsmanship, the quality of the wood, and pickups. There are definitely many other options, but these are the prominent features that affect the price. Here is a breakdown of which guitars I would get per level:
Entry Level ($150-400)
Mid Level ($400-800)
Pro Level ($800+)
Now, after you get your electric guitar, one of the next things you’ll be asking yourself is “what kind of amp do I need?” I can tell you, hands down, the Fender Mustang series is the PERFECT practice amp. It’s literally all you need…so much so, that it is the official practice amp of the Freeway Music locations. One of the best ways to ensure that you get all you need is to purchase a package. So, let’s get that out of the way and talk about it. Here are some packages our friends have at Sims:
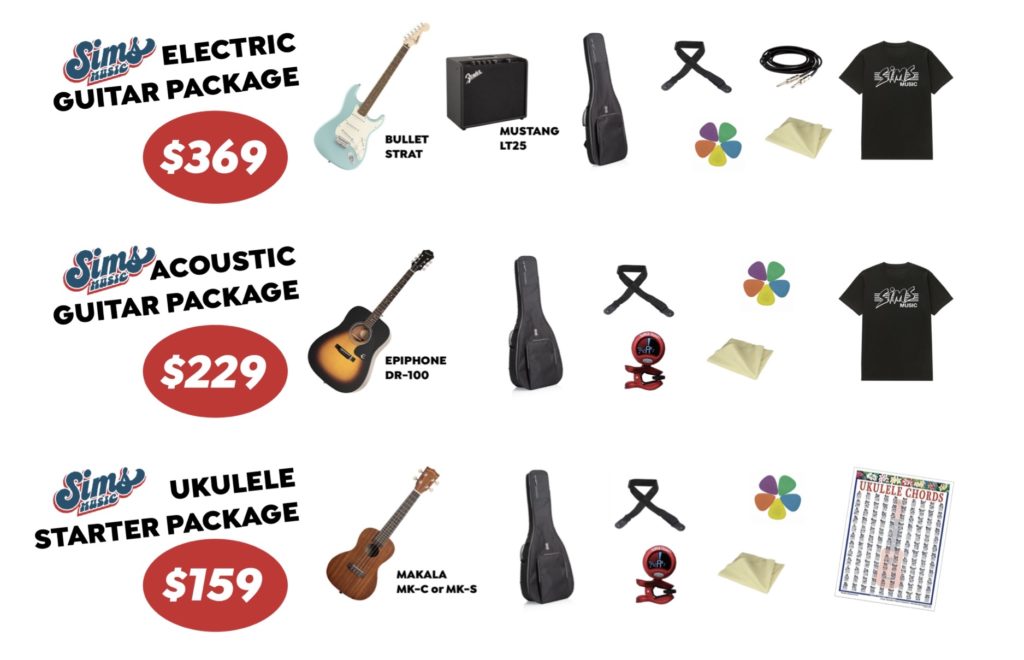
Acoustic Guitar
The good, better, best for acoustics is generally found in how much solid vs. laminate wood is involved. Entry level guitars tend to have a laminate top and back and sides. Mid-level acoustics have solid tops. The reason they do the top is because that’s where most of your sound resonates. So, if you have a solid top, it makes a difference. Pro-level guitars are generally solid all the way around with solid tops, sides, and backs. For the most part, you’ll run into the usual suspects for guitars. Here are some recommendations for various guitars at each level:
Entry Level ($150-400)
- Fender FA-15 (3/4 size guitar great for a smaller student)
- Fender (pretty much any)
- Ibanez (pretty much any)
Midlevel ($400-800)
Normally, I’d tout Martin and Taylor pretty hard in this range…especially the Taylor GS mini as it’s literally the perfect 3/4 guitar, but they are low in stock. So, I’d check out the Ibanez Artwood Series. They are great mid-level guitars.
Pro level
Can’t go wrong with Martin, Taylor, Gibson. They are king.
Ukulele
Ukes make for AMAZING holiday gifts because they are portable, easy to learn and play, and very affordable. Ukes tend to range between $50—$300, but float around that $50-150 mark for decent ones. Here are some brands to check out:
- Kala
- Cordoba
- Ortega *This is a newer brand that Sims recently started carrying. They look, sound, and play amazing. I just bought one for Sara Ann for Christmas. Don’t tell her ;)…She’s not reading this is she? :/
Keyboards/Pianos
So, if you’re looking for a serious acoustic piano, check out our friends at Rice Music House. They’ve got a great selection of acoustic pianos and will be of great help to you. The acoustic pianos at Freeway Music are from Rice. You can buy or rent.
If you are in the market for a Digital Piano, I like the Casio and Yamaha brands. You can’t go wrong either way. We stock the Casios at Freeway for our voice lessons.
There are also a slew of portable keyboard options available.
Percussion/Drums
Okay, I JUST started playing drums…so, give me a little grace in this department. It’s okay, I spoke with Justin at Sims, and he is an expert…so we will be alright! Here are some opinions of ours:
Entry Level
Ludwig Accent: Drive(full size for 12+) and Fuse (smaller for a younger kid 8-11)
Intermediate
Pro
PDP, DW, Ludwig, Pearl, and Tama are all gonna have solid options. You might want to consider some nicer cymbals at this point from brands like Zildjian and Sabian.
**Side Note: The cajon has been a popular instrument for drummers as of late for acoustic sets. Check out the LP Americana cajon… it was designed by our very own Justin Sims! 🙂
Recording
So, you wanna ease into recording. The best way to get started is by grabbing one of the Scarlet Focusrite Packages They have two different ones. Both come with a mic, mic cable, headphones, and an intro version of Protools. The only difference is one is solo and has one channel ($219), and the other is a duo with two channels ($269).
Stocking Stuffers
There are a ton of accessories such as capos, tuners, string winders, polish, cables, slides, pedals, shakers, tambourines, sticks, picks, and most importantly…Music Lessons! 😉
Whew…That was a lot of information. I hope this was helpful and Happy Holidays from the Freeway Family! 🙂
Alternate Guitar Tunings
After studying the guitar for many years, one of my favorite things to do is to twist the tuners into a different tuning. It forces me back to basics of just experimenting and relying on my ears. I find this is a great way to explore creativity. I’m gonna explain some common alternate guitar tunings, share some more obscure ones, and talk about how to create some of your own.
Common Alternate Guitar Tunings
Drop D: D A D G B E (all Tunings are Low E to High E left to right)
This is the most common alternate tuning. Simply lower your low E to a D. This gives you a nice lower sound and an easy way to make power chords. You’ll find this tuning from rock to finger-style.
Double Drop D: D A D G B D
This guitar tuning is similar to Drop D except that you move the high D down as well. From here you can maneuver into a few other tunings:
Dadgad: D A D G A D
This tuning is just like its name suggests.
Ex. tune: “Barton Hollow” by The Civil Wars
Open D: D A D F# A D
Open G: D G D G B D
This tuning is used a lot by Rolling Stones lead guitarist, Keith Richards. Although, he sometimes took off the Low D string as it “got in the way.”
All of the above tunings are very similar.
Other alternate guitar tunings include:
Open E: E B E G# B E
This is a great slide guitar tuning. Make sure you have extra strings handy, because you just might pop a string tuning to this one.
Tunes that use open E: “She Talks to Angels” by The Black Crowes and “The Cave” by Mumford & Sons.
More Alternate Guitar Tunings
Shift that G# down to F# and you have Open E Sus2. This is the tuning used for “In Your Atmosphere” by John Mayer.
Another interesting tuning that John Mayer uses is Drop C in “Neon”. Simply tune the low E down to a C.
You can pretty much make any tuning you want simply by twisting the tuners to create an open chord. Here are some examples of tunings I’ve used in my own songs:
“Cold Stream”
Open A: basically open G (as explained above) and capo on the 2nd
“Fireflies”
Open C: E G E G C E
In my newest song, I used an open A6/9 tuning: E A C# F# B E
This tuning is rich and was so much fun to play with.
Here is my “secret” alternate guitar tuning that I’ve been holding on to. I call it “Open Cello.” It’s called so because you tune the bottom four guitar strings to the notes of a cello and then I shift the B up to C:
C G D A C E
Open Cello is a blast to play in.
Make Your Own Alternate Guitar Tunings
So, how do you go about getting started? There are a couple approaches. One is to pick a random chord and try to spell it out with open strings.
For example, if you wanted an E Major 9, you need these notes: E, G#, B, D#, F#
So, take your existing strings to those pitches:
E-E
A-G# or B
D-D#
G-F# or G#
B-B
E-D# or F# or E
The second approach is to just “ear it out.” Change the pitches until it makes an open chord that you like the sound of.
So, what are you waiting for? Twist your tuners, create a tuning, and see what creation is ahead of you. It will be like the first time you played the instrument. You’ll have that child-like wonder and rely more on your ears. You’ll have more fun than you could imagine. Best of luck!
I write this blog to help other guitarists be prepared for situations that arise at gigs, but also in part as a confession of sorts. I’ve played many gigs and have been caught without many things. So, I’ve decided to make a checklist for “you”…that includes 10 things all guitar players need in order to be prepared for a gig.
1. Picks
This seems like a no-brainer, but oftentimes guitar players leave picks sitting on bars, by their bedside, in a pair of jeans, etc. Then, they get to the gig and realize they don’t have one. This happened to me once at a gig at Speakeasy. I ended up having a 3 hour practice of finger-style guitar. Don’t get me wrong, it was good practice, but not necessarily fun when I had a song I could really use a pick on. So, leave some picks in your guitar case, bag, or some place where you keep up with them. Jerry Sims gave me a nifty pick pouch that has served me well. The common thread that you will see throughout this blog is to HAVE BACKUP.
2. Strings
I have absolutely finished a gig playing without one of my strings. Again, it tests my ability to adjust chord shapes, melodies, etc, but it is certainly limiting. I’ve learned that the best thing to do is keep a extra packs of strings in my case or bag. Another tactic is to bring a back-up guitar. Try buying strings in bulk from your local dealer. That way, you have a ton of strings on hand.
3. Batteries
Batteries are an absolute must. Your acoustic may die, you may need one for a pedal, your 9 Volt adapter may have a short in the wire, your bass player may need one, tuners, etc. All of these examples have happened to yours truly. I carry a couple of 9-volts with me at all times, just in case I need one.
4. Cables
If you think your cables will never go out, you are sadly mistaken. Even nice cables can go bad. Sometimes it’s not even your fault. An audience member could spill liquid onto a cable or step on one wrong. Always have a couple of backup cables. Don’t ever have just the amount you need. As soon as one would break, you’d have to modify your whole rig or not be able to play at all.
5. Tools
You should have some basic tools available: screwdriver, pliers, string cutter, Allen-wrenches, etc. You could even has a basic soldering iron kit if you know how to repair your own cables. This can save you on the above item #4. Sometimes, you may have to tighten a strap button, an input jack, or change strings. The bottom line is to have some basic tools available to help you out in these situations and KEEP THEM IN YOUR BAG OR CASE. If you borrow it from your gear to fix something at home, you better return it as soon as you are done. Otherwise, you’ll find yourself stuck in a situation at a gig.
6. Capo
There are several tunes that I play with a capo in my group and duo. I certainly can get by without it, as I feel confident transposing; however, this sometimes requires using more bar chords which can be tough on a long acoustic gig. Also, some songs just sound better with open chords. I would definitely recommend keeping a capo in you guitar case…especially your acoustic guitar case.
7. Strap
Confession time…I’ve been forced to be very innovative in the past to create straps when I forgot mine. One gig I used my belt. I took it off and cut a hole on either side of it to make a strap. At another gig, I used the shoulder strap from a luggage bag. I know, this sounds ridiculous, and I agree. I was, at the very least, resourceful. Nowadays, I keep a strap in each guitar case and an extra strap in my bag.
8. Extension Cable
You never know how close to a power outlet you will be and you never know if the place will have a cable. I’ve actually had to run out to CVS and buy an extension cable. It’s always good to have one handy.
9. Power Strip
Sometimes you may need to share power with your bandmate because he/she forgot a power strip or the person who hired you for the gig may have a projector, wireless mic, or some other device that requires power. In any case, it’s always better to have more options than you need.
10. Three to Two-Prong Adapter
Believe it or not, some old buildings still have two-prong outlets. I have learned this the hard way. This situation caused me yet another trip to the hardware store. Have a three to two prong adapter available just in case.
I’m sure there are some things missing from the list, but I know these will certainly help you avoid a tricky situation. Please, email us with any other ideas for blogs, or any items you think should be included on this list: lessons@freewaymusic.net
You go into a gig and see a person playing a guitar with a monstrous pedal board in front of him. His hands are barely moving, yet he has tons of sounds and noise coming from his rig. Sound familiar? It’s all smoke and mirrors, disguising the fact that the guitarist doesn’t really have a grasp of his instrument and hides behind sound and guitar effects.
Figure Out Your Your Flavor
I didn’t use a multitude of effects growing up simply because I could not afford them and I was forced to play with what I had. The beauty of this situation was that I discovered MY sound in MY fingers first. You can take the same guitar and hand it to different guitarists and they would each make it sound differently. Don’t bury your playing with a lot of “cake icing” from effects without discovering your own flavor first.
Bake a Solid Cake
Being More Creative With Your Icing
What I am NOT a saying is that “effects are bad.” On the contrary, I believe they are awesome and extremely useful. The great thing about being a skillful muscian is that you can still make the same effects as a lesser skilled musician, but you can do things the lesser skilled musician can’t do. It doesn’t detract from the value of effects; it adds. It’s way easier to establish your skill then add effects, than to be too effect heavy and add skill later. You won’t be hiding a “so-so” cake with icing.Sorry this blog was so heavy with metaphor, but I really wanted to drive the point home with a picture. Make sure you find your tone, hone your skill, and experiment with effects to enhance your skill. This method will help you build a solid foundation upon which to build your musicality. Best of luck with your music journey!
Related Articles
5 Things That Might Be Adversely Affecting Your Guitar Playing
The It’s a word we all fumbled over as we began to read aloud as kids. Most of our words work phonetically from the alphabet that we learn. Teachers and parents patiently waited as we sounded out “r-u-n” or “j-u-m-p” in our first reading encounters. There came a time, though, when “sight-words” were introduced. Which is why, at the beginning of this paragraph, you heard the word “the” in your head as you read and not “tuh-heh”—which would be the literal sounding out of the word. At some point, we also learned how to spell the word “the,” realizing in the process that it looked nothing like what the phonetic equivalent would be.
Music is a language.
Approaching the aspect of rhythm from a linguistic point of view by expanding your vocabulary of rhythmic “sight-words” can make speaking music a much more instantaneously satisfying and simple process. Getting to the point of being able to consistently speak/tap/play a specific rhythm correctly without having to count through it (i.e. sound out the word). This process of learning “rhythm sight-words” may only involve a measure—or it may involve an entire phrase. Internalizing patterns so they can be easily “spoken” (played) allows you as a musician to read quickly, understand poly-linear rhythms (two different patterns happening at the same time), use patterns in improvisation, incorporate new rhythms into your song writing, and learn music by ear with pattern recognition.
Hooked On Rhythmics
As a pianist, I often separate rhythms and pitches for beginning students learning how to read. Sometimes when I encounter a new piece, there will be times that I simply pat out or speak rhythm patterns before attempting to play the piece. Here are some tips for growing your vocabulary when it comes to “rhythmic sight words.”
1) Isolate small sections of rhythm that you’re either drawn toward or fumble over. Start with a measure that trips you up or a section of a riff in a song that you find yourself tapping or humming.
2) If reading rhythms, count out loud and work with a metronome to ensure that you’re playing them correctly (you don’t want to be playing a rhythm incorrectly for the rest of your life…haha). If you picked a section of rhythm by ear, make sure you can play/speak/tap it accurately, and then write out the rhythm that you picked, making sure it lines up with the original recording. The first time you do either of these things, you may need to work with a teacher who can guide you through it—it’s also helpful to have someone double check accuracy. Remember that everything takes a little longer the first time and gets easier with repetition—think about the first time you read a sentence aloud.
3) Once you’ve gotten totally comfortable with the pattern, play or sing it in context. As a pianist, I often play multiple lines, so I attempt the rhythm in conjunction with the other lines that are supposed to be played simultaneously.
4) Take and find the pattern out of context. Try playing scales, arpeggios, or new ideas in that rhythm pattern—this is a great way to keep warming up from being boring! Find the pattern in other pieces of music, whether through listening or reading, and explore ways to use the patterns in other songs. Maybe use the pattern in your own songwriting.
Finally, remember that music is a language and that to be fluent in any language the skills of conversation, reading and writing, are non-negotiable. Work for fluency so that you can express yourself fully and easily in your music! You’ll be amazed at how this takes the fun of playing music to the next level.
Kate
Other blogs by Kate:
New Year’s Resolution From a Pianist: Part 1